GA-Z77X-UD3H and GA-Z77X-UD5H-WB WIFI Review

These two mainboards are quite different, because they belong to the entry and the top segment of the Intel Z77 Express based series from Gigabyte. Yet, they both boast convenient layout, rich functionality, good overclocking potential and a number of proprietary technologies such as 3D Power, 3D BIOS and Ultra Durable 4.
Quite a bit of time has passed since Intel announced their Ivy Bridge processors and new 7th series chipsets. Since the launch day we have already got acquainted with many mainboards from the largest makers, including, of course, Gigabyte. Strange as it might seem, but this still doesn’t give us the right to claim that we are familiar with the basic features of mainboards from all the major names in the mainboard market. In particular, Gigabyte G1.Sniper 3 mainboard is a special product that belongs to the G1-Killer gaming series, while the conventional Gigabyte mainboards will have a completely different look and feature set. In order to get a complete picture of what Gigabyte mainboards on Intel Z77 Express chipset have to offer, one would have to check out all 16 models available these days, which is, obviously, almost impossible to accomplish. We believe, however, that checking out an entry-level and a high-end board will allow us to cover most of the functional spectrum. Therefore, we decided to go with Gigabyte GA-Z77X-UD3H for the entry-level, and Gigabyte GA-Z77X-UD5H-WB WIFI for the more advanced level of products.
Closer Look at Gigabyte GA-Z77X-UD3H
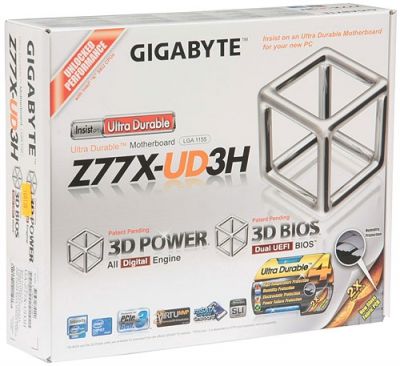
Gigabyte GA-Z77X-UD3H is shipped in a small box with the design typical of this mainboard series. The front of the package has the model name of the board and the icons of all supported technologies. The back of the box has a mainboard photograph, a brief list of technical specifications and short descriptions of a few selected features illustrated by graphs and diagrams.
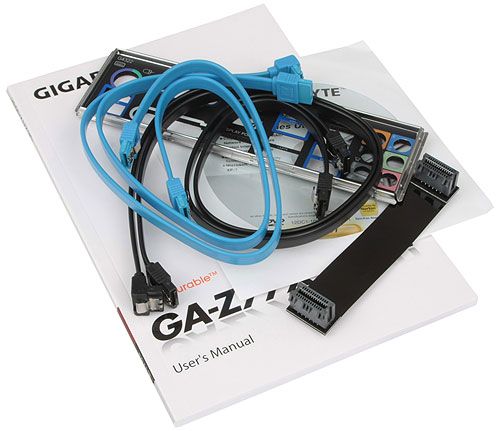
The accessories bundle is quite modest and includes only the necessary minimum:
- Four SATA cables with metal connector locks, half with L-shaped locks and another half with straight ones;
- A flexible bridge for Nvidia 2-Way SLI graphics configurations;
- I/O Shield for the back panel;
- User manual;
- Brief installation guide in different languages;
- DVD disk with software and drivers;
- “Gigabyte” logo sticker for the system case.
As for Gigabyte GA-Z77X-UD3H mainboard, it looks pretty common, but has a number of peculiarities, which are worth pointing out here.
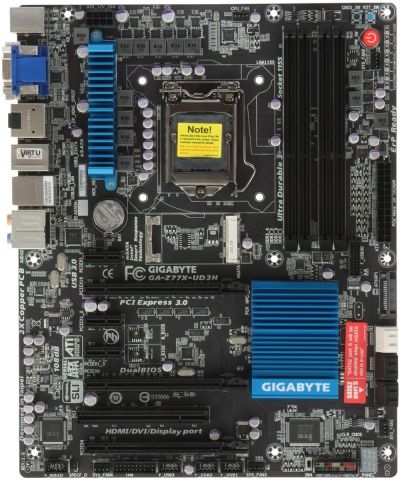
I would like to mention reliable screw-on retention used for the cooling heatsinks, but the only additional heatsink available on this board covers only some of the electronic components in the six-phase processor voltage regulator circuitry. However, 3D Power voltage regulator that powers not only the processor, but also the memory and the integrated graphics core, doesn’t heat up too much even during overclocking, therefore, we can’t consider this a serious issue. However, this mainboard boasts a very extensive variety of additional features, which isn’t typical of the entry-level products. These features include such useful things as Power On, Reset and Clear CMOS buttons, POST-code indicator, and special voltage control points for manual voltage monitoring. For many years Gigabyte has equipped their mainboards with two BIOS chips, and recently they also introduced a special switch that allows the users to select any of these chips manually. However, the major distinguishing feature of this mainboard is undoubtedly the mSATA connector that allows using Intel Smart Response or Intel Rapid Start technologies. Intel Z77 Express chipset provides the board with two SATA 6 Gbps ports and four SATA 3 Gbps ports, though one of the latter won’t be available if you are using the mSATA connector, as stated on a red warning sticker on the PCB.
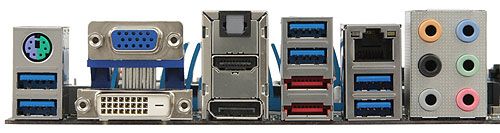
There are no USB 2.0 ports on the back panel, but there are six USB 3.0 ports. The chipset supports two of them and also an additional onboard pin-connector. Another four ports are implemented using VIA VL800 controller. There is another red sticker warning that these ports won’t be available until the drivers have been successfully installed. Among other peculiarities of Gigabyte GA-Z77X-UD3H mainboard we should also mention the rarely employed high-quality VIA Vinyl VT2021 sound codec and an integrated network adapter built using another rare chip – a Gigabit Qualcomm Atheros ETHOS AR8151 controller. Overall, the mainboard back panel offers the following connectivity:
- Universal PS/2 connector for keyboard or mouse;
- Six USB 3.0 ports (blue connectors) implemented via Intel Z77 Express and a four-port VIA VL800 controller. There is one internal pin-connector for additional two USB 3.0 ports, and three pin-connectors for six USB 2.0 ports;
- D-Sub, DVI-D, HDMI and DisplayPort video Outs;
- Optical S/PDIF and six analogue audio-jacks provided by VIA VT2021 HD audio codec;
- Two eSATA 6 Gbps ports implemented via Marvell 88SE9172 controller;
- A local network port (network adapter is built on Gigabit Atheros AR8151 network controller).
There are two PCI Express 3.0/2.0 x16 graphics card slots on the mainboard, which work as 1×16 or 2×8 and support AMD CrossFireX and Nvidia SLI graphics configurations. The third PCI Express 2.0 x16 slot can work at x4 maximum speed, as it shares its lanes with three PCI Express 2.0 x1 slots. There is also a PCI slot for additional expansion cards. The board can also accommodate a TPM module and has connectors for five cooling fans. You can clearly see all the distinguishing features of this mainboard on the traditionally impeccable layout:
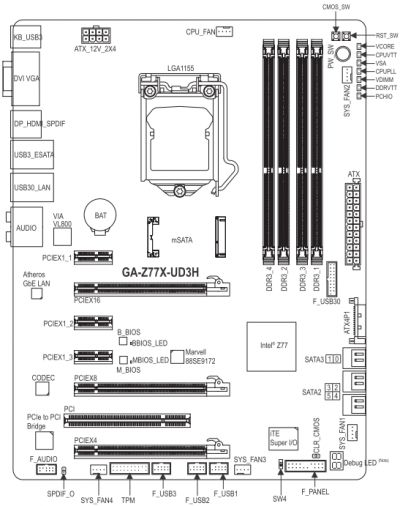
The board is designed following Ultra Durable 4 technology principles that imply the use of double copper layer, high-quality components, has implemented protection against higher temperatures and voltage fluctuations, EMI and excessive humidity. You may have noticed that it says “Ultra Durable 3” on the mainboard PCB right next to the memory DIMM slots, but Gigabyte claims that it is none other but a typo.
Closer Look at Gigabyte GA-Z77X-UD5H-WB WIFI
The box with Gigabyte GA-Z77X-UD5H-WB WIFI mainboard looks exactly the same as the box from the previous board, but the similarities end with the design. The box itself is, in fact, a little larger and the internal packaging is different.
We only see the exterior slip-on box made of thin glossy cardboard, which covers a regular white cardboard box with the mainboard and accessories. The board is sealed inside an anti-static pouch and secured in another cardboard casing. All accessories are neatly arranged in four section beneath the board:
- Six SATA cables with metal connector locks, half with L-shaped locks and another half with straight ones;
- A flexible bridge for Nvidia 2-Way SLI graphics configurations;
- W-Fi/Bluetooth kit;
- Gigabyte GC-WB300D PCI-E Wi-Fi/Bluetooth card;
- Two Wi-Fi antennas;
- USB 2.0 cable;
- Small poster with assembly instructions;
- DVD-disk with software and drivers;
- I/O Shield for the back panel;
- A module with two USB 3.0 ports for the 3-inch bay of the system case;
- User manual;
- Brief installation guide in different languages;
- DVD disk with software and drivers;
- “Gigabyte” logo sticker for the system case.
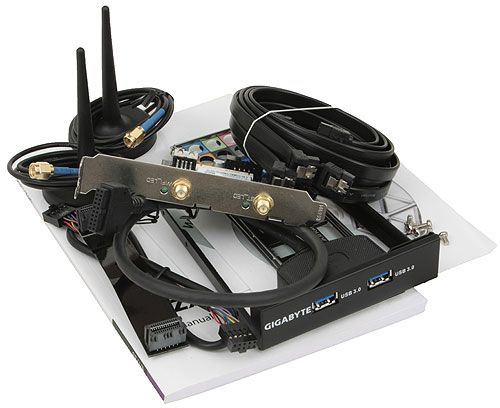
I can’t help pointing out the USB 3.0 module for the 3-inch bay of the system case. But it is the Wi-Fi/Bluetooth kit that makes Gigabyte GA-Z77X-UD5H-WB WIFI mainboard really stand out among other products. This kit is exactly the same as the kit that comes with Gigabyte G1.Sniper 3 mainboard. It is based on Atheros AR5B22 mini PCI Express card. It is a dual-band (2.4 and 5 GHz) Wi-Fi adapter that supports IEEE 802.11 a/b/g/n and is combined with a Bluetooth 4.0 adapter. Not it is clear that the two additional letters in the model name – “WB” – stand for Wi-Fi and Bluetooth. By the way, if you do not need wireless technologies support, then you can purchase an exact same mainboard but without the wireless/Bluetooth kit. It is called Gigabyte GA-Z77X-UD5H. Besides, the GA-Z77X-UD3H mainboard discussed earlier today also has a sister – GA-Z77X-UD3H-WB WIFI, which comes with a wireless kit — Gigabyte GC-WB150. Unlike the dual-band GC-WB300Dworking at up to 300 Mbps speeds, this model is a single-band solution with the maximum connection speed of 150 Mbps.
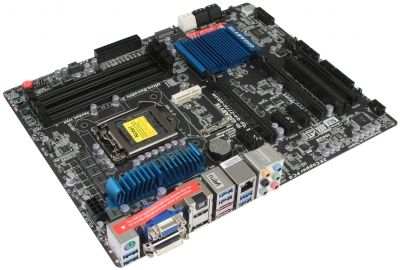
Gigabyte GA-Z77X-UD5H-WB WIFI mainboard belongs to a higher-end category than the previously discussed model, but nevertheless, they have a lot in common. What is important to us at this point is to uncover significant differences hiding behind the similarities, just like we have seen with the seemingly identical mainboards’ packaging.
The first thing we would like to dwell upon is the twice as many phases in the processor voltage regulator circuitry: 3D Power VRM of the Gigabyte GA-Z77X-UD5H-WB WIFI has twelve phases. The heating components are covered with two additional heatsinks and they are tied into a single cooling contour including the chipset heatsink with a heatpipe. All heatsinks are fastened with screws. It looks like the mainboard received this enhanced cooling system mostly as the indication of the board’s high-end status rather than out of actual necessity: the heatsinks get barely warm. Just like the previous mode, Gigabyte GA-Z77X-UD5H-WB WIFI has a mSATA slot connected with one of the four SATA 3 Gbps ports as stated by the warning sticker on the PCB. The Intel Z77 Express chipset delivers support for two SATA 6 Gbps ports (white connectors) and SATA 3 Gbps ports. Another three SATA 6 Gbps ports (gray connectors) are provided by two additional Marvell 88SE9172 controllers. The fourth port is laid out as an eSATA 6 Gbps on the back panel.
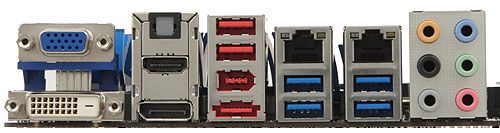
Overall, we find the following ports and connectors in the back:
- D-Sub, DVI-D, HDMI and DisplayPort video Outs;
- Two USB 2.0 ports, four more are available as onboard pin-connectors;
- IEEE1394 (FireWire) port implemented with VIA VT6308P controller, a second port like that is available as an onboard pin-connector;
- One eSATA 6 Gbps port implemented via Marvell 88SE9172 controller providing one internal SATA 6 Gbps connector, another controller like that adds two more internal pin-connectors for SATA 6 Gbps ports;
- Four USB 3.0 ports (blue connectors) implemented via Intel Z77 Express and two VIA VL810 hubs. Three internal pin-connectors provide support for additional six USB 3.0 ports;
- Two local network ports (network adapters are built around Atheros AR8151 and Intel 82579V Gigabit network controllers);
- Optical S/PDIF and six analogue audio-jacks provided by eight-channel Realtek ALC898 codec.
Unlike the previous mainboard, there is no PS/2 combination port for the mouse/keyboard. The number and type of video outs remained the same, but they added an IEEE1394 (FireWire) port and a second network port. Additional USB 3.0 ports are now provided not by the VIA VL800 controller, but by two VIA VL810 hubs. Besides the four USB 3.0 ports on the back panel, these hubs also provide three internal pin-connectors that could deliver another six USB 3.0 ports. This board has the same number and type of expansion card slots as the previous one, but there are also a few differences. The third graphics card slot also works as x4, but its uses the processor PCI-E lanes and not the chipset ones. We have already seen the same configuration on MSI Z77A-GD65 mainboard before. So, the slots may actually work as 1×16, 2×8 or x8+x4+x4, though the third slot will only work with Ivy Bridge processors, which is mentioned on a sticker right next to it.
Just like the previous model, Gigabyte GA-Z77X-UD5H-WB WIFI is designed using Ultra Durable 4 technology principles, has Power On, Reset and Clear CMOS buttons, a POST-code indicator, special voltage control points for manual voltage monitoring and two BIOS chips. The user can switch between the chips using a two-position switch and the active chip is marked with an LED right next to it. the board can take up to five cooling fans and the components layout is just as illustrative and impeccable as that of the Gigabyte GA-Z77X-UD3H:
Technical Specifications
For your convenience we summed up all the technical specifications of the two Gigabyte mainboards in the following table:
BIOS Functionality
In our Gigabyte G1.Sniper 3 mainboard review we pointed out a number of changes compared with the first version of Gigabyte 3D BIOS. The new revision of Gigabyte 3D BIOS not only looks different, but has undergone significant modifications in the feature aspect as well.
In particular, we have already pointed out that since all the important voltage parameters are gathered on the one tab available in “3D Mode”, it would be very convenient to also allow adjusting them here without the need to switch between multiple pages of the “Advanced Mode”. However, in the beginning they didn’t even have the parameter that would allow adding a specific value to the nominal processor voltage. Later on they introduced this parameter, but it didn’t work correctly. Now this parameter is fully operational in the BIOS of Gigabyte GA-Z77X-UD5H-WB WIFI mainboard.

However, things haven’t yet changed for Gigabyte GA-Z77X-UD3H and this parameter doesn’t work yet, though the “template” for it is there already.
This seems to be the only significant difference between the BIOS functionality of the two mainboards: the list of available parameters and their supported adjustment intervals are the same in both cases. Therefore, we are going to talk about the BIOS functionality using the Advanced Mode of the Gigabyte GA-Z77X-UD5H-WB WIFI mainboard as an example.
When you switch to the “Advanced” mode, you get into the “M.I.T.” (MB Intelligent Tweaker) section, which contains all parameters related to overclocking and performance optimizations. The section main screen only lists all sub-sections and reports the basic system data.
Then we see a purely informational “M.I.T. Current Status” sub-section telling you the current operational parameters of the system.
The “Advanced Frequency Settings” sub-section allows you to adjust frequencies and multipliers and there are special informational parameters that will keep you posted about the changes you are making.The settings dealing with processor technologies, detailed adjustment of the CPU clock frequency multiplier and power-saving modes are singled out onto a separate page called “Advanced CPU Core Features”. “Advanced Memory Settings” sub-section allows you to fine-tune the memory sub-system.
Parameters controlling numerous memory timings are all on separate pages. You can set the timings simultaneously for both memory channels or individually for each one of them.
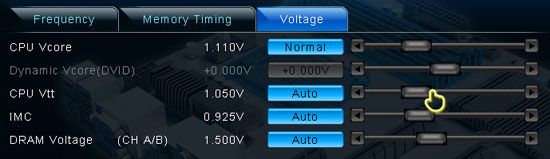
“Advanced Voltage Settings” sub-section allows you to work with different voltages that are all grouped into three separate pages. There are a few new parameters in the “3D Power Control” page, which appeared due to the introduction of “3D Power” technology. Now you can set the operational mode for the processor voltage regulator, adjust the level of Vdroop counteraction under heavy load and change a lot of other options right in the BIOS.
The voltages in different parts of the processors can be changed on “CPU Core Voltage Control” page. The CPU Vcore may be locked at a certain value or you may also add a certain value to the nominal setting.
The voltages may be not only increased, but also reduced below the nominal, which may come in very handy sometimes. For example, you may need it if your CPU is functioning at the lower than nominal frequencies or if you are using low-voltage memory modules.
The “PC Health Status” subsection reports current voltages, temperatures and fan speeds. The rotation speed of four fans out of five can be adjusted. You can adjust the rotation speed of the CPU fan and three system fans separately. You can select one of the two preset modes – Normal or Silent – or adjust fan settings manually to your liking. Only the rotation speed of the fourth system fan can be monitored but cannot be adjusted.
All adjustable fan connectors allow slowing down the fans even if they have a three-pin connector, because they finally brought back the “CPU Fan Control Mode” parameter. Now Gigabyte mainboards are again capable of adjusting the rotation speed of three-pin CPU fans. This feature was lost when they switched to AMI BIOS code, but is now back.
“Miscellaneous Settings” sub-section appeared and remained empty or disappeared completely from Gigabyte mainboard BIOS on several occasions. It turns out this is where you select the operational mode for your PCI Express 3.0/2.0 x16 slots.
The “System” section is similar to the “Standard CMOS Features” section of the older BIOS. It will tell you basic system information and show the list of connected drives on the “ATA Port Information” page. You can also change the date, time and interface language here.
The “BIOS Features” section is where you define your boot devices order, enable the startup picture, control other parameters and technologies, e.g. virtualization, and specify access passwords. The “Peripherals” section is about external devices and additional onboard controllers. Chipset-specific technologies like Intel Rapid Start and Intel Smart Connect are also set up here.
”Power Management” section contains a conventional set of parameters pertaining to the mainboard power supply and start-up.
To apply or dismiss your changes you go to the “Save & Exit” section. Here you can also restore default settings. This section also offers you two parameters for BIOS settings profiles management. You can save or load up to eight BIOS profiles, assign each of them a descriptive name. You can also save profiles to external media.

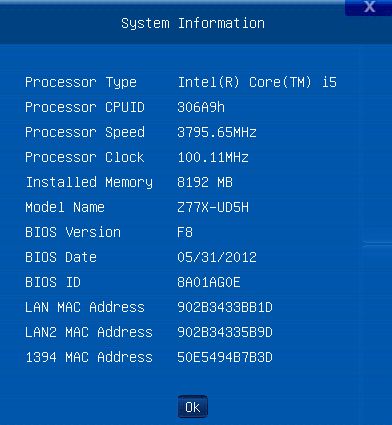
Some of the functional keys still work the same way. Just as before, F9 will bring up system information.
The built-in Q-Flash utility for BIOS updating can be launched by pressing the namesake button or the F8 hot key. It has become more convenient to work with and now shows you both the current BIOS version and the new one you are trying to update to. But it is still unable to work with NTFS disks and the current BIOS version is saved only in the root folder of a disk rather than where you choose to.

We weren’t too upset about some of the shortcomings uncovered in the very first version of the Gigabyte 3D BIOS, because we were certain that they would continue to enhance and expand its functionality. And we were absolutely right. They added the option to increase the processor Vcore by adding a specific value to the nominal setting in 3D Mode, even though this function doesn’t work on all the board just yet. The originally limited options for BIOS settings profiles management have been restored almost completely. It is again possible to adjust the rotation speed of three-pin processor fan. They came up with a very simple way of selecting the active mode. If you made all changes and saved them in 3D Mode, then you will be automatically sent to this mode when accessing the BIOS next time, if the last save was hit in Advanced Mode, then this is where you will get after system reboot. So, after improving and updating everything, the new Gigabyte 3D BIOS offers a full set of features for successful system configuring, fine-tuning and overclocking, so that there is hardly anything else you could possibly wish for at this time. And most likely we will soon see even more improvements, which we are very excited about already.
Testbed Configuration
We performed all our tests on a testbed built with the following components:
- Mainboards:
- Gigabyte GA-Z77X-UD3H rev. 1.0 (LGA1155, Intel Z77 Express, BIOS version F11);
- Gigabyte GA-Z77X-UD5H-WB WIFI rev. 1.0 (LGA1155, Intel Z77 Express, BIOS version F8);
- Intel Core i5-3570K CPU (3.6-3.8 GHz, 4 cores, Ivy Bridge rev.E1, 22nm, 77 W, 1.05 V, LGA 1155);
- 2 x 4 GB DDR3 SDRAM Corsair Vengeance CMZ16GX3M4X1866C9R (1866 MHz, 9-10-9-27 timings, 1.5 V voltage);
- Gigabyte GV-T797OC-3GD (AMD Radeon HD 7970, Tahiti, 28 nm, 1000/5500 MHz, 384-bit GDDR5 3072 MB);
- Crucial m4 SSD (CT256M4SSD2, 256 GB, SATA 6 Gbps);
- Scythe Mugen 3 Revision B (SCMG-3100) CPU cooler;
- ARCTIC MX-2 thermal interface;
- CoolerMaster RealPower M850 PSU (RS-850-ESBA);
- Open testbed built using Antec Skeleton system case.
We used Microsoft Windows 7 Ultimate SP1 64 bit (Microsoft Windows, Version 6.1, Build 7601: Service Pack 1) operating system, Intel Chipset Software Installation Utility version 9.3.0.1020, AMD Catalyst graphics card driver version 12.4.
Operational and Overclocking Specifics
Both mainboards boast very convenient and well thought-through design, so it was easy to assembly systems on them. Upon system boot-up you see a start-up logo, with a reminder about active hot keys.
It doesn’t make much sense to disable the start-up image, because unfortunately, the mainboards do not display any start-up information on the screen. The only thing you will see in this case is the AMI BIOS logo. We didn’t uncover any serious issues during the mainboards’ performance in the nominal mode as well as during overclocking, although each board had a few unique peculiarities, which are worth pointing out here.
We were surprised when we didn’t get the sound working right away on our Gigabyte GA-Z77X-UD5H-WB WIFI mainboard. Microsoft Windows 7 OS usually uses standard integrated sound driver and there is no need to install any special drivers as long as you are satisfied with the basic sound functionality. Gigabyte GA-Z77X-UD5H-WB WIFI uses a common and very popular Realtek ALC898 codec, but there was no sound, even though Gigabyte GA-Z77X-UD3H with a pretty rare VIA VT2021 codec worked fine. However, as soon as we installed Realtek’s audio drivers, the sound on Gigabyte GA-Z77X-UD5H-WB WIFI started working perfectly fine, so we wouldn’t call it a problem. It was just a little weird.
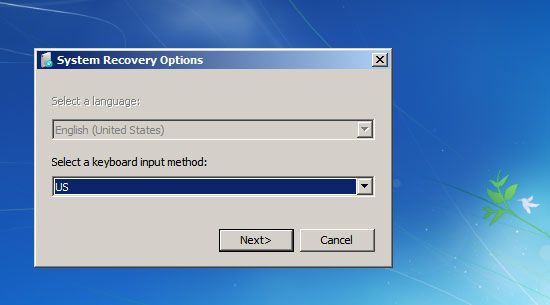
We experienced more of an issue (which was also easily resolved in the end) with the Gigabyte GA-Z77X-UD3H mainboard. During our mainboard tests we install and remove various applications, and during overclocking experiments we may often face unplanned system overloading and may even see a blue screen of death. Of course, it has its toll on the operating system functioning that is why we reinstall it fresh right before we start our performance and power consumption tests. Microsoft Windows 7 is very easy to install and this process doesn’t take long, it is the system configuring that is usually more time consuming. To save some time and at the same time ensure that all products are tested in identical conditions we use backup/restore function integrated into the OS. Even before we started the testing we installed the OS, configured it as needed, installed all necessary test applications. After that we created an image of the system partition without installing any of the drivers. So, now all we have to do is restore the image and install the drivers required for each specific mainboard and we have a clean OS install ready for the test session.
It is very quick and easy to restore the system from an image and there are rarely any issues with that. After rebooting the system we select the keyboard layout and select the default image in the next screen (although you may select any other image if you have to). Then we point out the destination partition and wait. However, the problem we faced was that neither the mouse nor the keyboard were working, so we couldn’t actually move beyond the start-up screen.
There are six USB ports on the back of the Gigabyte GA-Z77X-UD3H mainboard, but four of them are implemented using VIA VL800 controller. They will only work after the drivers have been installed, which is mentioned in the manual and on a special sticker on the board itself. Of course, we connected the mouse and keyboard to the remaining two ports implemented through the chipset. We didn’t have any problems neither in the BIOS, nor in Windows, but both these ports got disabled in the pre-installation backup/recovery mode. We also tried the “incorrect” ports, tried using another BIOS version, but no luck. In the end we were about to give in and run the mainboard performance tests without the “clean” OS that remained after the Gigabyte GA-Z77X-UD5H-WB WIFI test round, when suddenly everything started working. It turned out that switching the mouse and keyboard ports did the trick. Who could have thought?
Speaking of overclocking, the boards behaved differently, although their BIOS functionality is almost identical. We already know that our Intel Core i5-3570K processor at about 1.2 V Vcore can work at 4.6 GHz frequency, but it is important to find the voltage settings for each specific board individually. Both mainboards had no problem ensuring processor stability at 4.6 GHz with the memory frequency increased to 1867 MHz at the same time.
Now I just have to remind you that we always overclock mainboards in such a way that they could be used permanently in this mode. Therefore we do not try to make our life easier by disabling any of the mainboard’s features, e.g. onboard controllers, and try to keep the CPU’s power-saving technologies up and running. This time we did exactly the same thing. All Intel power-saving technologies remained enabled and automatically lowered the processor Vcore as well as clock frequency multiplier in idle mode.
Performance Comparison
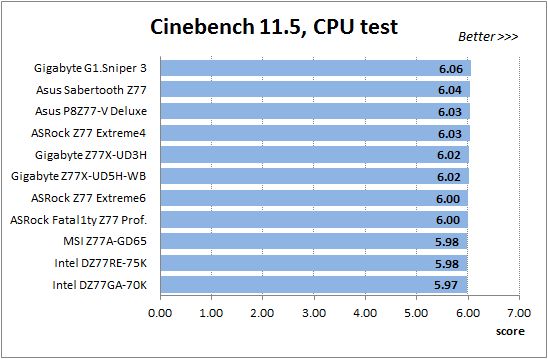
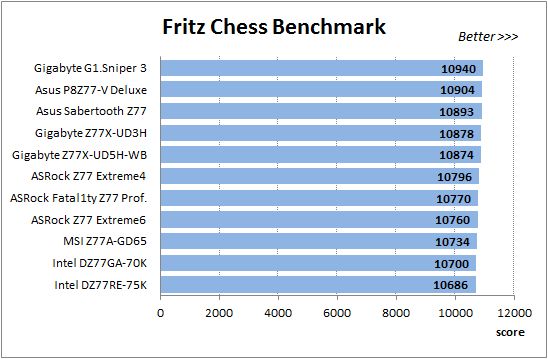
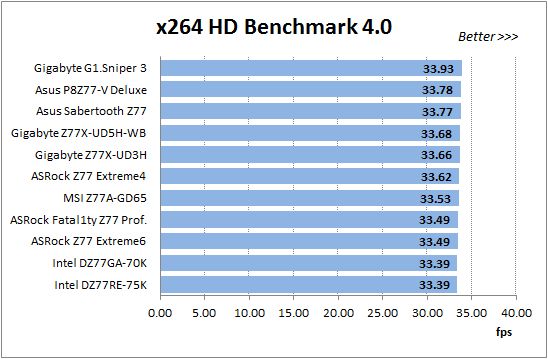
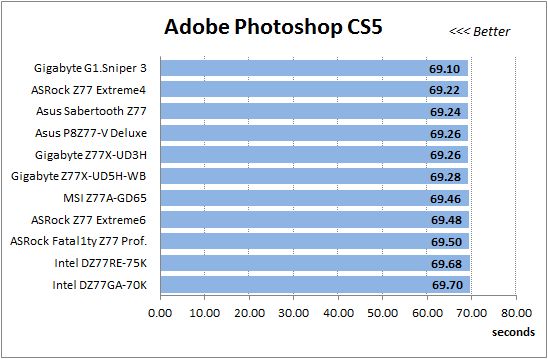
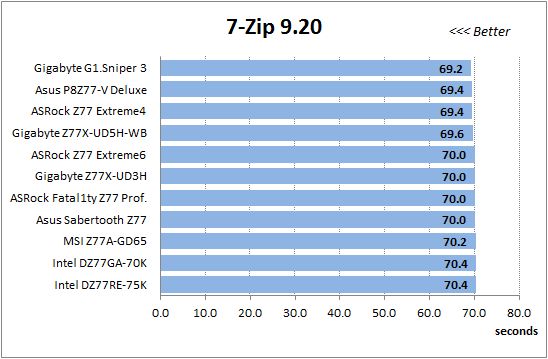
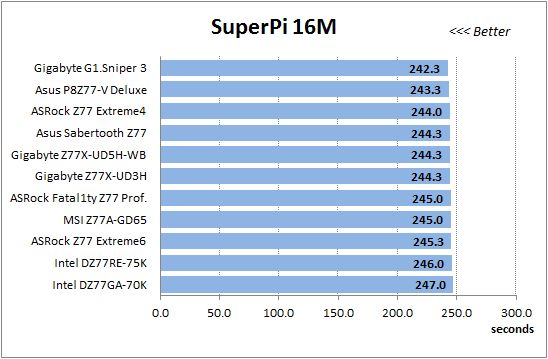
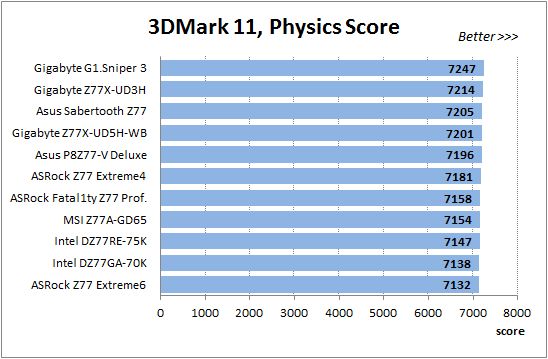
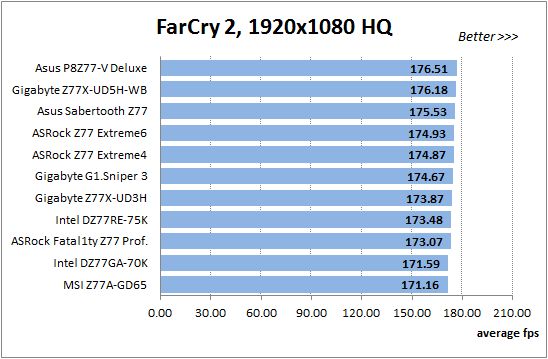
As usual, we are going to compare the mainboards speeds in two different modes: in nominal mode and during CPU and memory overclocking. The first mode is interesting because it shows how well the mainboards work with their default settings. It is a known fact that most users do not fine-tune their systems, they simply choose the optimal BIOS settings and do nothing else. That is why we run a round of tests almost without interfering in any way with the default mainboard settings. For comparison purposes we also included the results of the previously reviewed ASRock Fatal1ty Z77 Professional, ASRock Z77 Extreme4 and ASRock Z77 Extreme6, Asus P8Z77-V Deluxe, Asus Sabertooth Z77, Gigabyte G1.Sniper 3, Intel DZ77GA-70K and Intel DZ77RE-75K, and MSI Z77A-GD65 mainboards. The results on the diagrams are sorted out in descending order.
Nominal Mode
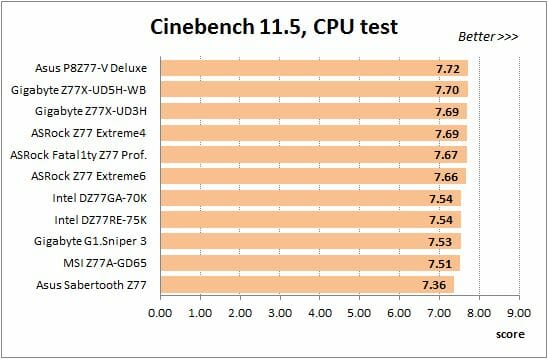
We used Cinebench 11.5. All tests were run five times and the average result of the five runs was taken for the performance charts.
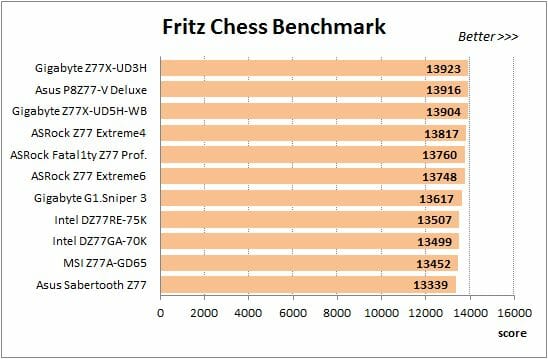
We have been using Fritz Chess Benchmark utility for a long time already and it proved very illustrative. It generated repeated results, the performance in it is scales perfectly depending on the number of involved computational threads.
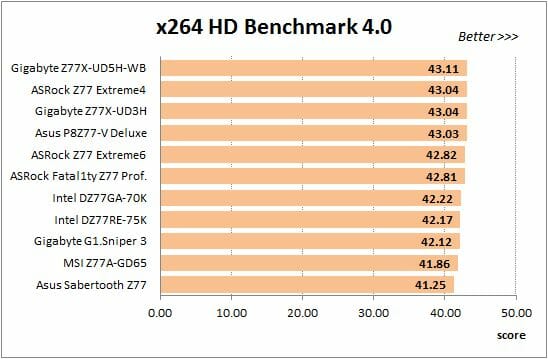
A small video in x264 HD Benchmark 4.0 is encoded in two passes and then the entire process is repeated four times. The average results of the second pass are displayed on the following diagram:
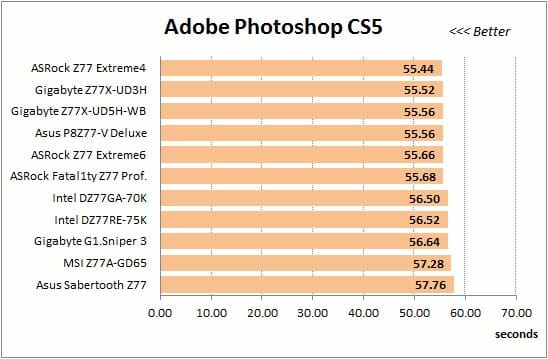
We measured the performance in Adobe Photoshop using our own benchmark made from Retouch Artists Photoshop Speed Test that has been creatively modified. It includes typical editing of four 10-megapixel images from a digital photo camera.
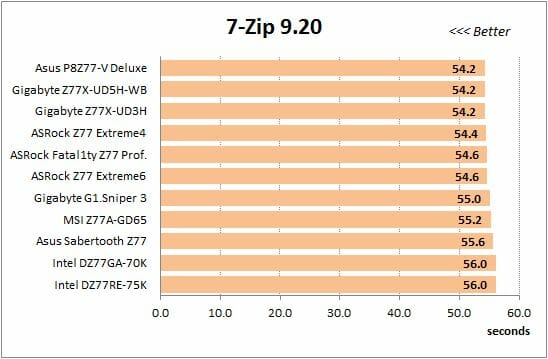
In the archiving test a 1 GB file is compressed using LZMA2 algorithms, while other compression settings remain at defaults.
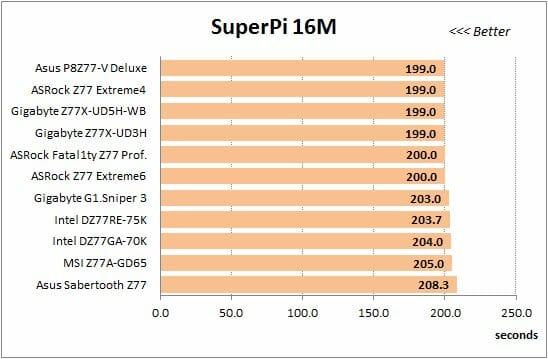
Like in the data compression test, the faster 16 million of Pi digits are calculated, the better. This is the only benchmark where the number of processor cores doesn’t really matter, because it creates single-threaded load.
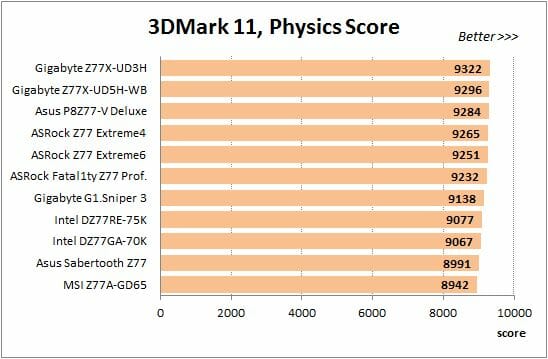
Since we do not overclock graphics in our mainboard reviews, the next diagram shows only CPU tests from the 3DMark11 – Physics Score. This score is obtained in a special physics test that emulates the behavior of a complex gaming system working with numerous objects:
We use FC2 Benchmark Tool to go over Ranch Small map ten times in 1920×1080 resolution with high image quality settings in DirectX 10.
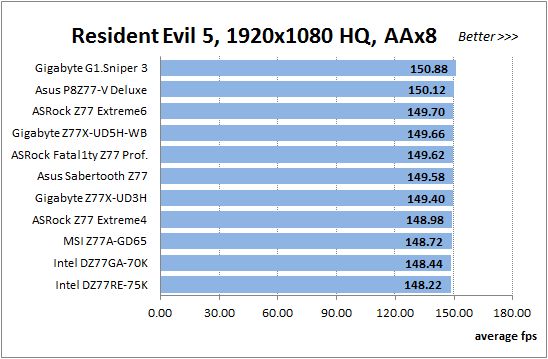
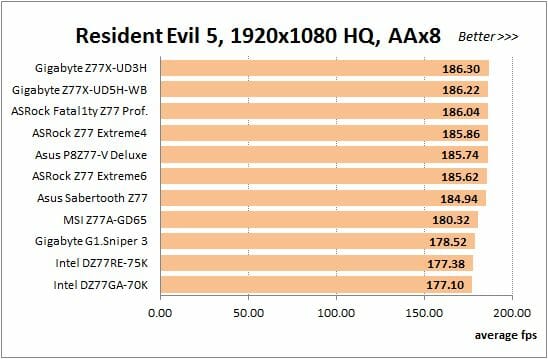
Resident Evil 5 game also has a built-in performance test. Its peculiarity is that it can really take advantage of multi-core processor architecture. The tests were run in DirectX 10 in 1920×1080 resolution with high image quality settings. The average of five test runs was taken for further analysis:
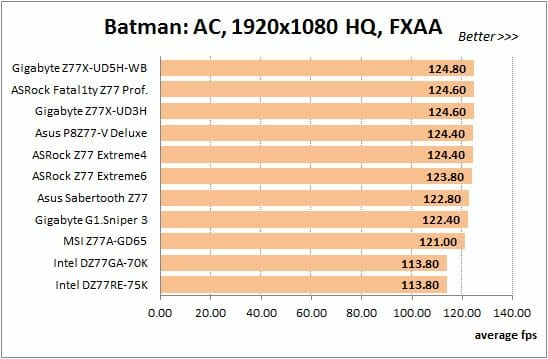
Batman: Arkham City game also reacts eagerly to any changes in the CPU clock frequency, but it uses DirectX 11. We ran game’s integrated benchmark five times with high image quality settings and then take the average of the five runs for the diagrams.
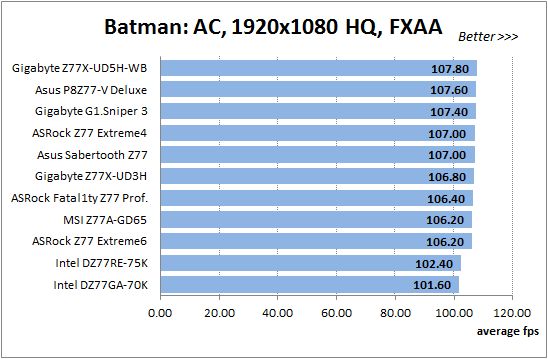
Gigabyte GA-Z77X-UD3H and GA-Z77X-UD5H-WB WIFI performed as expected in the nominal mode, without any sudden ups or downs, and were always somewhere around the center of the diagrams.
Overclocked Mode
Overall, things do not change during overclocking. The table below shows the results of our overclocking experiments:
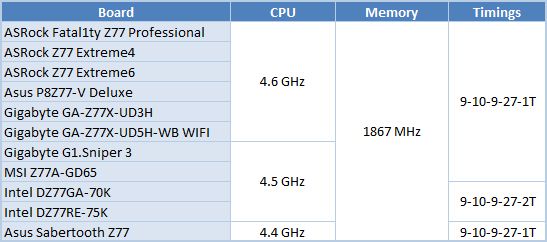
Since both mainboards managed to overclock our test processor and memory to their maximum, they are part of the leading group of six mainboards with the same overclocking results on the diagrams. Moreover, they are often at the top of the pack, frequently taking the absolute lead:

Even though there is very small difference in performance between Gigabyte GA-Z77X-UD3H and GA-Z77X-UD5H-WB WIFI and the other mainboards that managed to overclock the CPU and memory to their maximums, we have every reason to state that they have no issues in the nominal as well as overclocked mode.
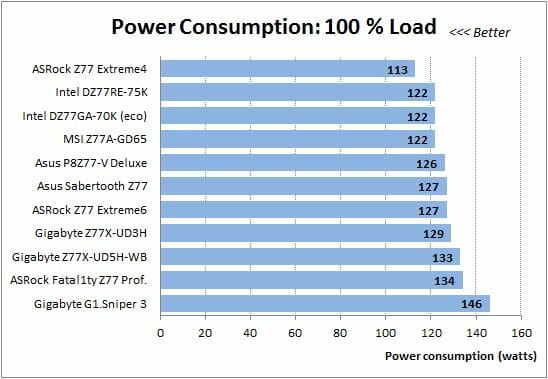
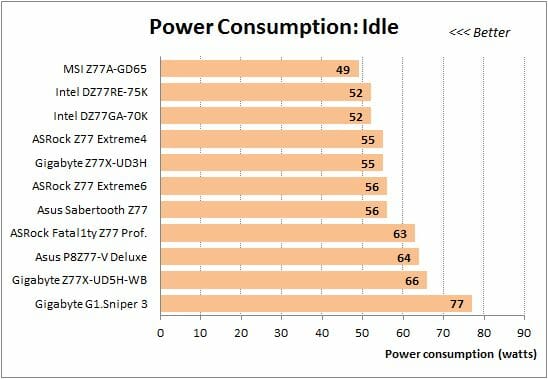
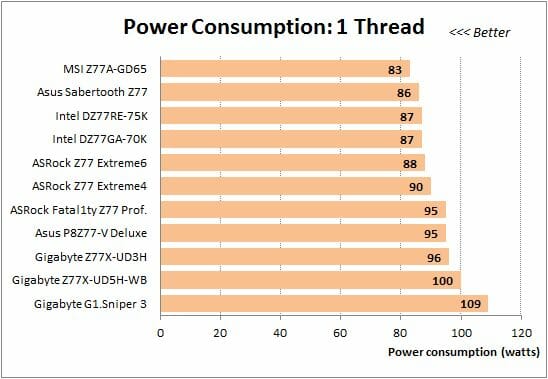
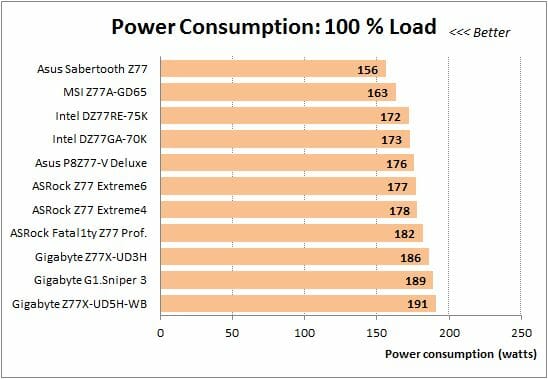
Power Consumption
We performed our power consumption measurements using an Extech Power Analyzer 380803. This device is connected before the PSU and measures the power draw of the entire system (without the monitor), including the power loss that occurs in the PSU itself. In the idle mode we start the system up and wait until it stops accessing the hard disk. Then we use LinX to load the CPU. For a more illustrative picture there are graphs that show how the computer power consumption grows up depending on the number of active execution threads in LinX (both at the default and overclocked system settings).
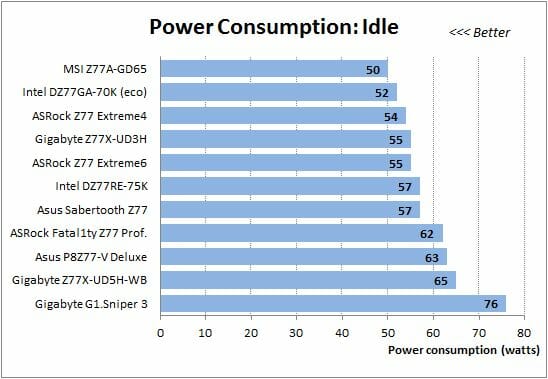
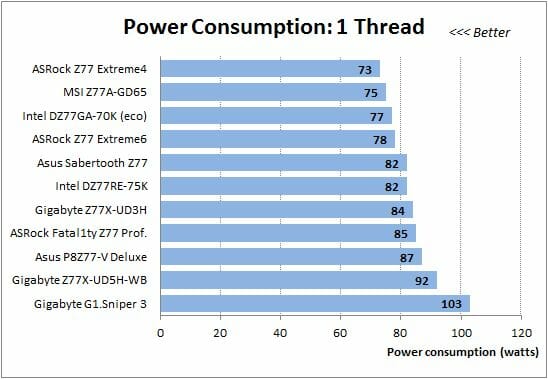
Unfortunately, unlike performance, Gigabyte mainboards seem to have some issues with power consumption, and they mostly show in GA-Z77X-UD5H-WB WIFI. Some time back we used to explain high power consumption of the Gigabyte G1.Sniper 3 mainboard by the presence of the additional PCI-E bus hub on the PCB. Of course, it does contribute to the overall consumption, but today it became obvious that this chip wasn’t the only one responsible. While GA-Z77X-UD3H demonstrated more or less acceptable power consumption levels, Gigabyte G1.Sniper 3 and GA-Z77X-UD5H-WB WIFI consume much more power than all the other testing participants. Let’s recall the common features of the two: very similar or even identical twelve-phase processor voltage regulator circuitries. Large number of voltage regulator phases is necessary when the CPU utilization is very high, but if the CPU is idling or its utilization is pretty low, then the use of a multi-phase voltage regulator may backfire. To resolve this issue many contemporary mainboards use special technologies that allow dynamic adjustment of the number of active phases depending on the CPU utilization at a given moment of time. However, it looks like this function doesn’t work on Gigabyte mainboards.
I have to say that all processor power-saving technologies work correctly by default on both Gigabyte mainboards lowering the processor clock frequency multiplier and voltage in idle mode. If you change the parameters related to power saving from “Auto” to “Enabled” in the mainboard BIOS, the power consumption doesn’t change. However, previously Gigabyte mainboards had rows of LEDs indicating the number of active phases in the processor voltage regulator circuitry depending on the current operational load. Now the LEDs are gone, but the boards acquired 3D Power technology and there appeared a “3D Power Control” page in the BIOS with the “PWM Phase Control” parameter on it. We measured the boards’ power consumption with this parameter at its nominal “Auto” settings, as well as at “Extreme Performance”, “Balanced” and even “Light Power”. However, we didn’t detect any differences in results. So, our experiments confirm that the dynamic adjustment of the number of active phases in the processor voltage regulator circuitry doesn’t really work. This could be the reason why Gigabyte mainboards consume so much power, which becomes especially obvious on the models with multi-phase voltage regulators. Although, I am sure that it may not be the only reason.
If the power consumption is not too good even in nominal mode, then it is hard to imagine that things will change during overclocking. Therefore, it wasn’t surprising to see that Gigabyte mainboards again required more power than their competitors.
Conclusion
I have to say that or overall impression from Gigabyte GA-Z77X-UD3H and GA-Z77X-UD5H-WB WIFI mainboards is highly positive. In fact, we didn’t have any serious problems with these boards during our test session. The only disappointment was their high power consumption, especially of the top model. Both these mainboards have convenient layout, rich functionality, good overclocking potential and a variety of proprietary technologies and features such as 3D Power, 3D BIOS, Ultra Durable 4. Their distinguishing feature is the mSATA connector that will let you take advantage of such technologies as Intel Smart Response or Intel Rapid Start. The presence of two BIOS chips now has huge practical value, because the convenient onboard switch allows you to work with either of them independently. We were very pleased with such nice extras as Power On, Reset and Clear CMOS buttons, POST-code indicator and special voltage control points. Numerous improvements in the new version of Gigabyte 3D BIOS make fine-tuning and overclocking even easier and faster, all the small issues we pointed out previously have been successfully fixed.
Long time ago Gigabyte mainboards with a “3” in their model name were extremely simple and had very limited functionality for the demanding enthusiasts. Today’s Gigabyte GA-Z77X-UD3H is a fully-fledged mainboard, which functionality has been additionally expanded with a number of onboard controllers. Gigabyte GA-Z77X-UD5H-WB WIFI is even more feature-rich: on top of the features of the junior model it has IEEE1394 (FireWire) support, a second network card and has more SATA 6 Gbps ports. Moreover, it comes with a discrete GC-WB300D PCI-E card offering wireless Bluetooth 4.0 and dual-band Wi-Fi supporting IEEE 802.11 a/b/g/n standards at up to 300 Mbps speed. If for whatever reason neither of these mainboards suits your needs, then you will undoubtedly find one among the other 14 models on Intel Z77 Express chipset that Gigabyte offers at this time.
Epilogue
If we look in retrospect at our opinion about mainboards in general, and Gigabyte mainboards in particular, we will notice certain changes. Let’s not go too far back and start with a time 2-3 years ago, when LGA 1366 and LGA 1156 started taking over the market. It was a definite uprise – golden days of Gigabyte’s growing popularity in the mainboard segment. And it wasn’t because they were dramatically different from competition. Overall they offered almost the same features and functionality as all other makers, but they boasted one almost invisible and undetectable, but at the same time indisputable advantage over everyone else: they were problem-free. Ideal mainboards do not exist, but unlike other products Gigabyte boards always worked and didn’t create any problems for users along the way. Need to work in the nominal mode? – No problem! Need to overclock your processor? – Easy! Of course, we enjoyed testing Gigabyte boards. It is interesting that at about the same time some rumors started circulating about Asus closing their mainboard business. There were still a lot of Asus mainboards coming out then, but they didn’t roll out anything unique.
However, when the LGA 1155 platform came around things changed. While other manufacturers tried to implement new unique features, for example, the same UEFI BIOS, Gigabyte seemed to continue offering us nothing principally new. It looked like Asus and Gigabyte mainboards had swapped places. AsusTek kept launching one unique product after another, while Gigabyte continued with good, but unremarkable models. The launch of LGA 2011 platform changed the game plan again. Gigabyte introduced new 3D Power technology that reminded us of the digital “DIGI+” from Asus, the boards had finally acquired UEFI BIOS called Gigabyte 3D BIOS. However, one lost year didn’t go unnoticed. Other manufacturers were at the polishing off stage, but Gigabyte just started uncovering first issues with their boards that needed to be fixed. Among them incorrectly working dynamic adjustment of the number of active phases in the processor voltage regulator circuitry, problems in Gigabyte’s 3D BIOS, inability to let the users work with each of the two onboard BIOS chips independently.
The launch of Intel’s Ivy Bridge processors and new 7th chipset series gave LGA 1155 another boost and again changed the situation in the mainboard market. Asus mainboards are still on top of the world, ASRock mainboards have become significantly better, but Gigabyte mainboards also started changing for the better. Now we see that the new Gigabyte 3D BIOS version is completely free of all previous issues, we have no complaints about the DualBIOS technology and two chips have become truly independent. There is still room for improvement with their 3D Power technology and power supply, because Gigabyte boards consume considerably more power than their competitors. But there is a very good chance that thing will be fixed very soon, especially since the new LGA 1155 mainboards from Gigabyte already use Ultra Durable 5 technology, which should bring dramatic changes specifically to the voltage regulator and power aspect. So, Gigabyte mainboards are not ideal yet, but it definitely looks like the one and a half years of slow motion are over. The company is on the right track, the improvements are obvious and undeniable and we look forward to the day when Gigabyte mainboards take their well deserved winning place.